
Snowmen Are Fearless but Usually Harmless
A snowman army is awesome to watch in action. Snowmen are brave litle guys. They always attack no matter how outnumbered or how powerful the enemy. They encircle an enemy and mercilessly throw their snowballs. On the other hand, snowmen can be stupid, for example, when most of a snowman army chases a harmless little slime while a few of their comrades take on an army of witches. I made a program to enable experiments challenging a snowman army with a variety of enemies, such as, creepers and wither skeletons.
Iron Golems Win Unless They are Way Outnumbered
Having tired of snowman army wars, which are rarely won by the snowmen, I introduced a my army option of iron-golems. Iron golems wipe out nearly every hostile MOB unless they are way out numbered. In the screenshot below, 10 iron golems are taking on a mob of 400 zombie pigmen, which will win in spite of the iron golems frantic hammering. This experiment can be started with chat commands “ig” followed by “zp 20 20” or by the single script command “sc3.”

Summary of Our Experiments
The table below summarizes the results of our experiments. The left column identifies the monsters. The second column is an abbreviation of two-word monster types, which can be used as chat commands instead of the monster’s long name. The third and fourth columns indicate whether or not the monster is available in Minecraft Education Edition and Windows 10, respectively. The next columns show war results for snowman armies followed by a column with the results for iron-golem armies. The right column is notes about the enemy MOB.The grayed out lines indicate that wars with that monster are not very interesting for the reasons noted.

Using Snowman Army
My Army, the Enemy and Wars
In this Snowman Army program, a “war” consists of “my army” and the “enemy.” My army is either snowmen or iron golems. The enemy can be any monster available in the version of Minecraft you are using. To start a war, two commands are typed into the chat window — one to define my army and one to define the enemy. The two armies are placed on the battlefield by the program and the war starts. The two commands are described below.
Quick Start
As illustrated in the drawing below, type into the chat window:
- Pick your army — Enter “sm” or “ig” for snowmen or iron golems, respectively. Do not include the quotes.
- Pick your enemy — Enter the name of a monster (e.g., “shulker” or witch).
- Watch the action.
- Go back to step 1 to start another war.

For example, the chat commands “sm” then “shulker” shown in screenshot below, generates the war in the screenshot below it.


Each army has dimensions, which, if not specified as arguments, are set to the defaults. Because the commands “sm” and “shulker” had no arguments, default dimensions 5 rows of 2 columns each were used. the Minecraft screenshot above, notice the snowballs near the shulkers, which indicate that some of the first row of snowmen had already been wiped out when the screenshot was taken.
Size and Placement of Armies
The following arguments are available or my army chat commands “sm” and “ig”:
- num1 — number of MOBs (snowmen or iron golems) to the east (columns)
- num2 — number of MOBs (snowmen or iron golems) to the south (rows)
- num3 — number of blocks between my army and the enemy and from the fence to an army

The on-chat commands defining an enemy has only two arguments:
- num1 — number of the enemy to the east (columns)
- num2 — number of the enemy to the south (rows)

Notice in the fist of these drawings that my army dimension are in MOBs East and MOBs South, but the enemy is in blocks East and blocks South. Using iron golems as a my army option, causes this problem. Unlike snowmen, iron golems are more than three blocks wide and, in addition, iron golems must be built with space in between because, if they are crowded, they will not come alive.
For a simplistic example, The screenshots below show that the command “sm 1 1 1″ followed by the command ‘shulker 1 1″ generates a one snowman, one shulker armies that are 1 block apart and one block from a the fence.”


The screenshot below uses the test mode of the program to generate default army sizes. Note that the iron golems have no pumpkins on their head thus they have not yet come alive. I used this mode to test the layouts generated by the program. I used shulkers because they rarely move from their initial position.

Even Quicker Starts
Random Cases and All Cases
A “case” is a particular choice of my army and an enemy. To run a cases or cases, using the chat window, type one of the following commands:
- ” random” — randomly picks my army, the enemy and the size of each. If an argument is specified, for example, random num1, runs num1 cases sequentially, pausing after each so that the player can watch the action.
- “allcases” — runs all possible combinations for my army and the enemy with default army sizes.
Both random and allcases sequences of cases can be stopped with chat command “stop” or by breaking any block of the green fence.
Advanced Features
Changing Configuration Variables
Usually a player will never change configuration variables. However, the most likely configuration variable that might be changed by a player is b_Education_Editoin, which if true, causes the program to use only the monsters supported by Minecraft Education Edition. Other configuration variables are discussed in the blog post about the Snowman Army code.

Adding Additional Enemy Types
After a war is started, additional enemies of any kind can be added by typing its name in the chat window. If length and width are provided, they must be less than or equal to the first enemy. If no arguments are specified, the added army will be the same size and in the same position as first enemy.
Adding Snowmen, Iron Golems and Enemies at Random Positions
After a war is started, additional members can be added to the armies via the following chat commands:
- “addSM num1” — adds num1 snowmen to the field at random positions.
- “addIG num1” — adds num1 iron golems to the field at random positions.
- “addEN num1” — adds num1 of the most recently specified enemy to the field at random positions.
Adding a Roof and Rain
Monsters that would otherwise burn up in the normal sunlight can live in a rainy environment. A roof protects snowmen from melting in the rain. The following commands are provided:
- “rain” and “noRain” –the current and later cases will either have rain or not have rain, respectively.
- “roof” and “noRoof” — the current and later cases will either have or not have a roof.
- “RR” and “noRR”– RR runs roof followed by rain. noRR runs norain followed by no roof.
Optional Fence
The following two chat commands are provided for experimenting with armies that can roam free versus those that are contained by a fence.
- “fence” and “noFence” — The current and later cases will either have or not have a fence, respectively until another command changes the option.

Run on-chat Command
The “run” command is provided just because a user my use it because so many program start with it. The “run” command executes the favs script; thus, providing several interesting cases for the player to view (see the section about scripts below).
Rerun on-chat Command
The “rerun” command runs the prior case using the last specified enemy. This enables a player to explore whether an identical case provides the same result.
Scripted Cases
In the context of MakeCode for Minecraft, a “script” can be defined as a sequence of chat commands that are specified in the script, instead of being individually typed into the chat window by the player. A script may also include pauses, which would normally be the time the player waits before typing in another chat command. The following scripts of interesting cases are built into Snowman Army:
- sc1 — snowmen, shulkers and witches (see script and screenshot below)
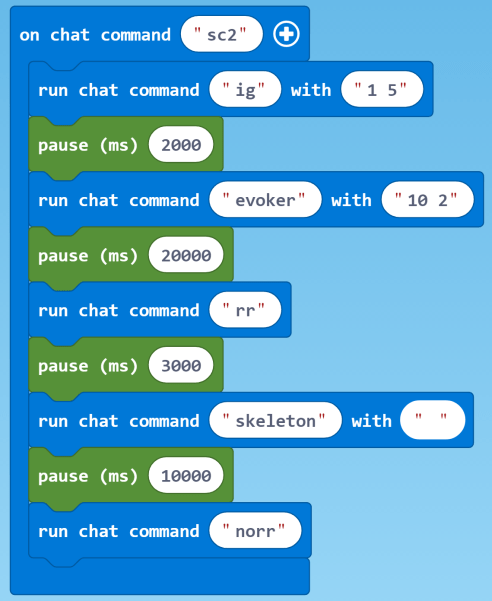
- sc2 –iron golems, evokers, skeletons (requires roof and rain) (see second script and screenshot below)
- sc3 — iron golems and many zombie pigmen
- favs — will run scripts sc1, sc2 and sc3.
A player can make her own scripts using the included ones as patterns.


Player Interface Summary
In summary, a player interacts with the program Snowman Army in the following ways:
- By typing on-chat commands into the chat windows (e.g., sm, evoker, rain).
- By breaking certain blocks (e.g., fence blocks) that trigger a program event
- By changing program configuration variables (e.g., b_Education_Edition)
- By writing scripts that automatically run interesting cases.
A more detailed description of the user interface is described in The Code for Snowman Army in MakeCode for Minecraft.
The Snowman Army Program Assumes a Flat World
This code assumes a flat world such as that described in MakeCode for Minecraft Sandbox World: Make It Flat and Simple.
Get the Code
Snowman Army code is shared on Code Connection at this URL
https://makecode.com/_Waq1xk5K0CfP
To get and use the code, follow these steps.

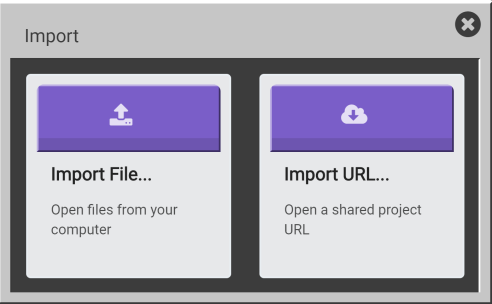
Click the Import button , which is upper right in the Code Connection window just below the banner. This will open the window shown below.

Click the Import URL button , which is on the right, to open the window shown below.


Paste the URL supplied for the program you want to use in the space under the text “Copy the URL …”

Click the Go ahead! button .
The next window you will see will be the MakeCode window with the code downloaded from the URL. At this point, you can treat it like any other code, e.g., run it, save it locally, modify it, publish your changes or whatever else your heat desires.
We have tested several other methods of downloading the code using the URL, for example, pasting the URL in a browser. No joy. For more detailed instruction see our post How to Use Shared MakeCode on Microsoft Code Connection for Minecraft.
You must be logged in to post a comment.