The Code that Processes Events in Response to Player Actions
The code in the not-grayed out area of the screenshot below processes events triggered by the player when something is clicked or tapped, for example, the Spawn Position or a control block.

Loading the Hotbar

After clearing it, the player’s Hotbar is loaded by the function shown below with the following items:
- minecart — must be selected before clicking or tapping to place a minecart on the rail.
- unpowered rail — useful when repairing square corners that sometimes appear when the rail is generated.
- power rail — useful if the player accidentally breaks a powered-rail block.
- grass — useful if the player accidently breaks grass. I do this when being too zealous with a long tap (tap and hold).
- minecart with hopper — helps to keep some of the debris off the rail.

Placing a Minecart and Spawning a MOB in the Minecart
Riding the Rail is made especially fun because it is easy for a player to place a minecart on the rail with a MOB in it. How the player does this depends on whether she is using touch or a mouse to click on Minecraft objects. The two ways are:
- Using a mouse, with a minecart selected in the Hotbar, right click on Spawn Position when it is clear of obstructions (e.g., another minecart, MOB, player). This will place a minecart at the Spawn Position and generate an on-minecart-used event, which places a MOB in the just placed minecart.
- Using touch requires the following two-step process:
- With a minecart selected in the Hotbar, quick tap on the Spawn Position when it is clear of obstructions (e.g., another minecart, MOB, player). This will place the minecart; however, no on-minecart-used event will be triggered. Because the event is not triggered, no MOB is placed in the minecart. Touch quick tap is equivalent to mouse right click.
- With a minecart selected in the Hotbar, tap and hold on the brown block long enough to break it. This will trigger an on-minecart-used event, which will result in placing a MOB in the minecart that was placed in step 1. Touch tap and hold is equivalent to mouse left click. See below for more information about the role of the brown block.

On-minecart-used Event
The on-minecart-used event, which is triggered as described in the previous paragraphs, calls a function to spawn a MOB at the Spawn Position, but only if the Boolean variable b_spawn_at_spawn_positoiin is true. This Boolean is toggled by the gray/black block to enable placing a minecart with or without a MOB, respectively (see below).

The on-minecart-used event spawns a MOB at the Spawn Position unless the gray/black block is black. The function that does this is spawn_at_Spawn_Position, which first calls the get_MOB_index function to get the index into the spawn list of the next or a random MOB to be used. It then spawns the MOB from he spawn list at index index_MOB. The MOB is spawned at Spawn Position.

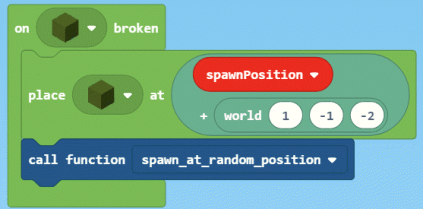
Brown Control Block Actions
As shown by the code in the following graphic, when the brown block is broken and triggers an on-block-broken event, the block is restored — and, according to the code below nothing else happens. Hmmm.

What actually happens depends on whether the player is using a mouse or touch. If using a mouse, there is no need to break the brown block — ignore it. You can break it all day long but nothing will happen.
If using touch, tap and hold on the brown block long enough to break and a minecart is selected in the Hotbar, an on-minecart-used event will be generated, which will place a MOB at the Spawn Position. Weirdly, no minecart is placed in spite of the on-minecart-used event being generated. If a minecart is at the Spawn Position, the MOB will be placed in it. The usage here is for the player to short tap the Spawn Position to place a minecart and tap and hold the brown block to generate the on-minecart-used event to place a MOB in the cart.
Gray/Black Control Block Actions
When broken the gray block will be replaced with a black and vice versa; thus causing the block to toggle between gray and black.

While it is gray, a MOB will be spawned at the Spawn Position each time the on-minecart-used event is fired. While the block is black, no MOB will be spawned when the on-minecart-used event fires; thus, enabling a minecart to be placed anywhere on the rail without a MOB being spawned at the Spawn Position. These actions are accomplished by setting a Boolean variable to true or false depending whether or not a MOB should be spawned when the on-minecart-used event fires.
Green Control Block Actions
When the green block is broken, the next MOB in the list is spawned at a random position inside the rail. The broken green block is restored.
The on-green-concrete-block-broken event spawns a MOB at a random position inside the rail. The function that does this is spawn_at_random_position.

The function get_MOB_index
This function is called by both the functions that spawn MOBs. The variable index_MOB is generated by get_MOB_index in the manner determined by the variable b_spawn_in_random_order, which was determined by the on-chat command the started the program.
If the MOBs are to be spawned in random order, the index_MOB is picked as a random number between 0 and the length of the spawn list minus 1.
If the MOB is to be spawned in the order in which they are in the spawn list (sequentially) , index_MOB is set to spawned_MOB_counter modulo length of spawn list. This nifty piece of math guarantees that index_MOB is 0 to length of spawn list minus 1.
Whether random or sequential, spawned_MOB_counter is incremented by 1.

Sandstone/Redstone Control Block Actions
When the sandstone block is broken, the redstone blocks under the rail are replaced with sandstone blocks; thus, removing power from the rail. The sandstone control block is replaced with a redstone control block.
When the redstone block is broken, the sandstone blocks under the rail are replaced with redstone; thus, restoring power to the rail. The redstone control block is replaced with a sandstone control block.
The code below that accomplishes this using the northwest and southeast rail corners, which are diagonally opposing to define the area in which to find blocks to replace. The corners array was defined earlier in The Code Part 3 — Build the Field for Riding the Rail in MakeCode for Minecraft.

Code Requires a Flat World
This code assumes a flat world such as that described in MakeCode for Minecraft Sandbox World: Make It Flat and Simple.
Get the Code
Riding the Rail code is shared on Code Connection at this URL
https://makecode.com/_bPdMMvgg5Mjw
To get and use the code, follow these steps.
Click the Import button ![]() , which is upper right in the Code Connection window just below the banner. This will open the window shown below.
, which is upper right in the Code Connection window just below the banner. This will open the window shown below.

Click the Import URL button  , which is on the right, to open the window shown below.

Paste the URL supplied for the program you want to use in the space under the text “Copy the URL …”

Click the Go ahead! button ![]() .
.
The next window you will see will be the MakeCode window with the code downloaded from the URL. At this point, you can treat it like any other code, e.g., run it, save it locally, modify it, publish your changes or whatever else your heat desires.
We have tested several other methods of downloading the code using the URL, for example, pasting the URL in a browser. No joy. For more detailed instruction see our post How to Use Shared MakeCode on Microsoft Code Connection for Minecraft.
Pingback: Code Part 1 — Overview of Riding the Rail in MakeCode for Minecraft | We Code MakeCode