The video above runs Monster Showtime from beginning to end. In the Code section below is a video that describes the MakeCode for Minecraft code that creates the show.

Watching the Show
The on-chat-command “run” starts the show. The players then needs to do three things:
- Move the player to look to the east. If you don’t know which direction east is, you can use a sunflower because it always faces east. Or, when the show starts, just scan around until you see the stage.
- If needed, press the F1 key so that the screen log does not show — All those teleport messages can be annoying.
- Sit back and watch the show — no hands needed.

Monster Showtime, after a flashy introduction, cycles though all monster types. For each monster type, it spawns three on the stage with the monster’s name displayed above. The program delays a bit before going on to the next monster type so that the player can contemplate the monster’s characteristics. About half way through the viewing of a monster, a skylight is opened in the stage roof so that the player can see some combustible monster’s catch fire.


Challenges Solved
I did a prototype of this program a few months ago, but the following challenges kept me from completing it until now:
- Arrays, especially text arrays, sometimes go crazy. For example, in an array of numbers, sometimes, for no apparent reason, MakeCode forgets that the variable is an array and thinks that it is just a single number. It gives a message that “a number[] cannot be assigned to a number” — like I didn’t know. Eventually, I found a workaround.
- The MakeCode print block is so slow that most people would give up waiting for monster names to print. Eventually, I found a way to dramatically speed up printing.
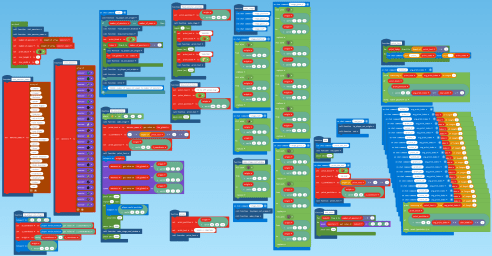
The Code
All the Monster Showtime code is shown in the screenshot below. On the left are the initialization routines. Right of initialization is “run,” which along with “do_one_monster” below it, defines the flow of the program. Moving right, are the routines that flash the initial display of “MONSTER SHOWTIME” and build the stage. Next right is the code that displays “THE END” and spawns a crowd of monsters to take a final bow. On the far right, are the fast print routines that make each monster’s type appear almost instantly above the stage.
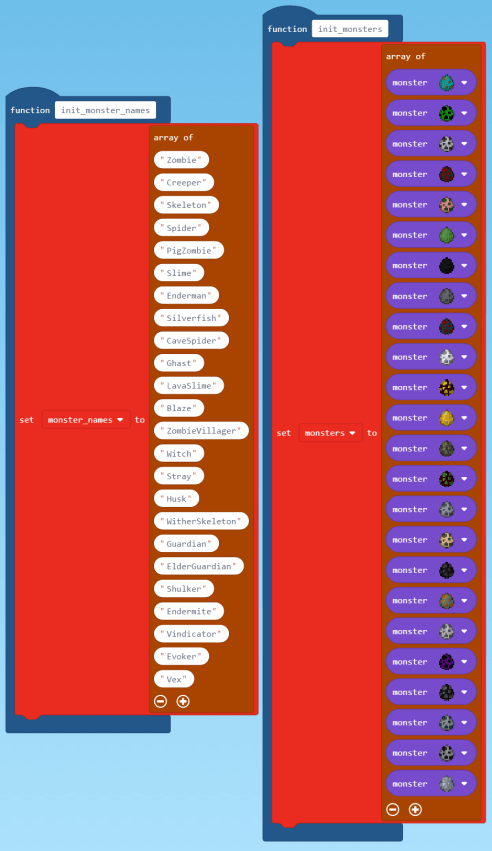
The On Start Block Initializes Variables
It is good practice to initialize variables that never change in the on-start block, as this code does below.
 The two arrays shown below must be the same length and the names in the same order as the corresponding monsters.
Run Starts the Program and Defines the Main Loop
The on-chat command “run” does the following:
- Calls a function to teleport the player to a new location and set the variable “origin,” which is used as the reference position in all building and spawning.
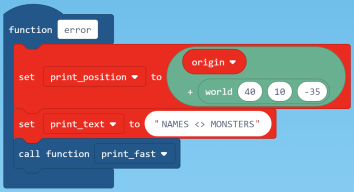
- Checks to be sure that the monster array and monster name arrays are the same length; and, if not, displays an error message and exits. If OK, continues with next step.
- Calls a function to flash “MONSTER” and “SHOWTIME” on the stage in oscillating colors. Another function displays a suggestion message to the player.
- Sets “print_block,” which is used by “print_fast,” to orange concrete, the color used to print the monster names.
- Loops through all monsters doing the following for each:
- Teleport player to new location and set “origin.”
- Set the global variable “idx_global” to the loop index. “idx_global” specifies the monster being processed.
- Calls the function “do_one_monster.”
- After all monsters are processed, teleports player to new location and runs “end” function.


Do One Monster
For each monster, the “do_one_monster” function does the following:
- Places a sunflower near the player to verify that the stage is being built to the east of the player.
- Calls the function “make_stage” to do just that.
- Sets “print_text” to the name of this monster, which is selected from the “monster_names” array at index “idx_global.”
- Calculates “Z_coordinate” such that the monster name will be centered when displayed.
- Sets the print position for the name using “Z_coordinate” calculated above and X and Y determined by trial-and-error.
- Calls “print_fast” to print the monsters name.
- Teleports the player to “origin” to move close to the stage for a good view of the monsters as they are spawned.
- Spawns three of this monster in a row on the stage. Of course, the monsters will not stay where they are spawned very long, but some longer than others.
- Pauses, then teleports back one block at a time using a loop. This makes the player slowly back up for a full view of the stage.
- Pauses, then builds a skylight in the stage roof so that sunlight shines on most of the stage. Some monsters will catch on fire in sunlight.
- Pauses for more monster viewing, then exits.

Build the Stage — Fast
The stage is built using several on-chat-commands, instead of functions, so that several elements of the stage will be built at the same time. This makes stage construction much faster. Speed is desirable because a new stage is generated for each monster.

The function “make_stage_roof_window” is called about half way through displaying each monster to allow sunlight, which makes some monsters catch fire. The on-chat-command “stage_test” is a tool for building a single stage for debugging purposes.
The “stage_test” function is included to enable testing “make_stage” independent of the program.
Print Fast
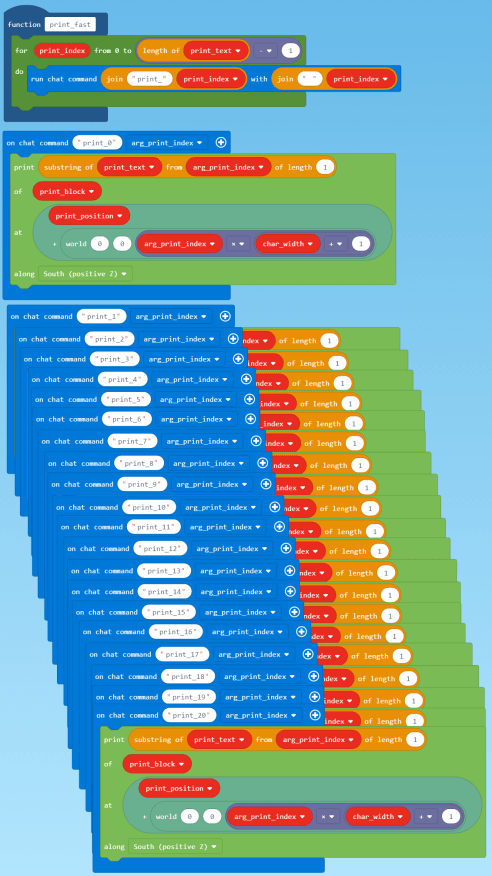
“print_fast” is speedy because all characters of the text string are printed at the same time, not one by one sequentially as they are using the normal MakeCode print block. To accomplish this, each character position, say 0 to 20, in a string must have its own print_n on-chat command. This code takes a lot of room. The good news is that all the routines are exactly the same except for the name. For example, the code shown below will print up to 21 characters using “print_0,” “print_1,” and so on to “print_20.”
The function “print_fast” loops through each character of “print_text” with the loop index “print_index” indicating the character to be printed. It calls a different print_n function for each character. It also supplies an argument, which is the number of the character to be printed.
“print_fast” uses some cleverness to be sure that each “print_n” routine does not share variables that might be changed by another “print_n” running at the same time.
-
- “print_text” is a global variable that is never changed by a “print_n” routine.
- The argument “arg_print_index” is unique to each “print_n” because arguments are local to an on-chat. This argument selects the character from “print_text” that is to be printed by this print_n. For example, “print_2” prints the third character of “print_text,” which is “i”. “arg_print_index” is also used to calculate the position at which the character will be printed relative to “print_position,” a global variable that is not changed within the “print_n” routines.
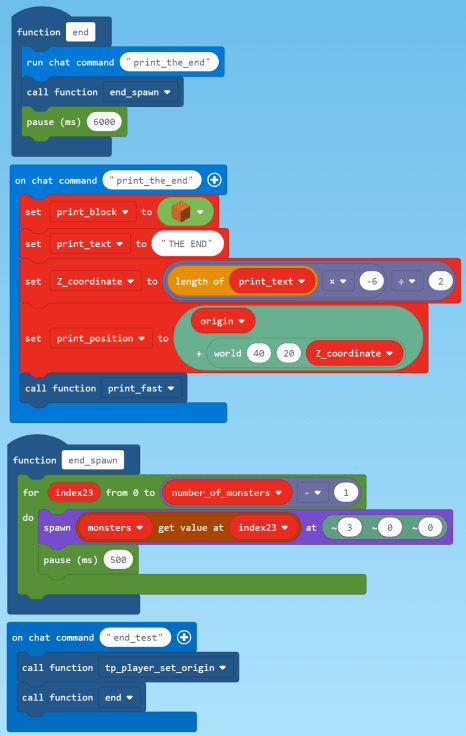
The End
At the end of the show, the monsters all come out to take a final bow.

The end function does the following:
- Prints “THE END” in the sky.
- Spawns all monsters in front of the player.
An on-chat command “end_test” enables testing the function without running the entire program.
Code Requires a Flat World
This code assumes a flat world such as that described in MakeCode for Minecraft Sandbox World: Make It Flat and Simple.

Get the Code
Monster Showtime code is shared on Code Connection at this URL
https://makecode.com/_h7bEY4TVifUK
To get and use the code, follow these steps.
Click the Import button ![]() , which is upper right in the Code Connection window just below the banner. This will open the window shown below.
, which is upper right in the Code Connection window just below the banner. This will open the window shown below.

Click the Import URL button  , which is on the right, to open the window shown below.

Paste the URL supplied for the program you want to use in the space under the text “Copy the URL …”

Click the Go ahead! button ![]() .
.
The next window you will see will be the MakeCode window with the code downloaded from the URL. At this point, you can treat it like any other code, e.g., run it, save it locally, modify it, publish your changes or whatever else your heat desires.
We have tested several other methods of downloading the code using the URL, for example, pasting the URL in a browser. No joy. For more detailed instruction see our post How to Use Shared MakeCode on Microsoft Code Connection for Minecraft.
Pingback: 25 MakeCode Programs Tested for Compatibility with both Minecraft for Windows 10 and Minecraft Education Edition | We Code MakeCode
Pingback: Missing Monsters in MakeCode for Minecraft Education Edition | We Code MakeCode